
What is Git, and why should you care? “Git is a free and open-source distributed version control system designed to handle everything from small to very large projects with speed and efficiency”. For Power BI people it means that you don’t need to use MyReport v1.pbix, MyReport v2.pbix, …, MyReport vn.pbix for your version control. Also, you have version history so that you can revert back to the wanted version. Moreover, it gives you the possibility for multiple people to work on the same file. But before I can talk about how to do that (this will be written in another post), you must learn about Git first.
Git Concepts
There are a few concepts that you need to understand before working with Git.
Repository
You can think about a repository (or repo) as a folder. You create different repos for different projects, and there, you save all your files related to it — also, the ones you want to have for version control. So, Git will track all the changes you will make to your files, and you will have your changes history.
While working with Git, you should have online/remote and local versions of your repo. For example, suppose you’re working on a Sales Analysis report. In that case, you should have a local repo called “SalesAnalysisReport” on your machine (e.g., your computer) and a “SalesAnalysisReport” remote repo (e.g., in GitHub or Azure DevOps repos). You can say you have a remote repo, and its clone on your machine, aka local repo.
The local repo will be a place where you will work with your files and make changes, and from time to time, you’ll sync it with the online/remote repo, similarly as you’re doing now with Power BI Desktop and Power BI Service.
Pull, Stage and Commit, Push
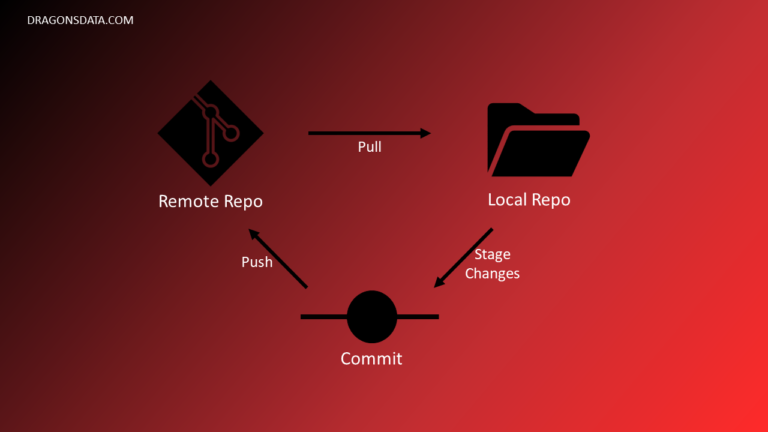
Commit
Commit is a snapshot of your repo at the time it is done. When you work with your files, at some point, you will want to record the current files stage to collect a history. So, you commit (or you could say “save”) your changes to your project’s repo.
When doing a commit, you must add a descriptive message about what you did. It tremendously helps when reviewing history.
Stage
Before doing a commit, you need to select (aka stage) what you want to commit. It means that you can commit not all changes that you made.
Pull
Pulling means you’re coping/cloning/syncing your remote repo to your local.
So, before committing your changes, you should always do a Pull to have the latest remote repo version.
Push
Pushing means that you’re publishing/uploading, aka pushing, all your local changes (commits) to your remote repo. Then, everyone using this repo will see and use your changes for their work.
Branching
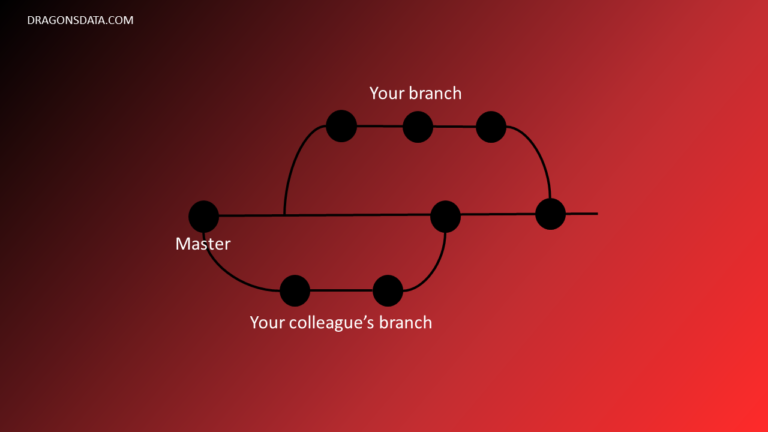
You can say that a branch in Git is a collection of commits where you can point to a specific commit. This is how you can visualise your changes and their history. Branching in Git lets you work with multiple branches. You will always have one main branch and feature branches (at least one). You can think about it as a production (main) branch and development (feature) branch(es). This is how you can work on multiple tasks simultaneously and have a clean history.
Merge
When you work with multiple branches, at some point, you will finish your changes and want to save your work in the main branch. This action is called merging.
There are multiple ways to save your changes from the feature branch to the main, e.g., merge, rebase or squash. But as for a beginner, it’s advised to use merge, so I won’t talk about other options in this post.
Workflow
So, how does all of this work? As I wrote at the beginning of this post, there will be another post where I will show you exactly how to work with Git and Power BI. Until then, I would like to share an example of how you can work with Git (if you don’t have anything set up yet). Note: It’s not the only way to do it!
The steps could look like this:
- Create a Remote Repo (could be in GitHub or Azure DevOps) for your project
- Upload all the files you want to use for version control
- Create a Local Repo with Git (could be with Visual Studio Code) by cloning the remote one
- Create a Feature Branch in the Local Repo
- Make your changes
- Stage changes you’ll want to commit
- Commit
- Push your commits to the Remote Repo
- Merge your feature branch with the main branch
Ending Note
I hope now you understand the most basic Git concepts and why it could be helpful to use it. In the next post, I’ll describe how to integrate and use it for Power BI.
It’s nearly impossible to find educated people on this subject, but you seem like you know what you’re talking about! Thanks
Thanks, Alberto!